Article | Posted on February 2015
cru·ci·form
study in architecture visualisation
Reading time: 10 minutes
Topics: WebGL, GLSL, three.js, making of
This is a legacy post, ported from the old system:
Images might be too
low quality, code might be outdated, and some links might not work.

cru·ci·form is my latest experiment while trying to learn 3D graphics, WebGL and three.js.
It started with a proof of concept of glossy reflections with parallax-corrected environment mapping, and it grew into an experience with baked lighting, camera scripting, music and postprocessing.
This won't be a very technical post. I will be explaining a bit some of the main features of the shader and render pipeline, but I'd like to explain with more detail the creation process and the workflow.
Motivation
A few months ago, user koola was showing some WIP in the ArchViz / Lighting forums of the Unreal Engine, and posted an amazingly beautiful video showing one of the pieces: UE4 Archviz / Lighting 4:
Check all the videos and images in the forums and in the YouTube channel, they are really inspiring.
I had seen Sebastién Lagarde video from Siggraph 2012 Local Image-based Lighting With Parallax-corrected Cubemap, and loved the concept although at the time I had no idea what it meant or how to implement it.
After all the work with shiny floating things and Spherical Environment Mapping, I tried to implement the method to correct the normal that is used to sample the cubemap. It's a surprisingly simple and powerful technique.
I worked for a bit coding a proof of concept, to understand the algorithm. Here are two different surface finishes (click the images to open the real-time version):
Specular material

Specular material

This is the part of the shader that performs the correction:
Parallax Corrected Cube mapping
GLSL - fragment shader
const vec3 cubeMapSize = vec3( 24.557362, 8.410262, 6.32 );
const vec3 cubeMapPos = vec3( 0, 0., 0 );

uniform samplerCube envMap;

varying vec3 pos;
varying vec3 vReflect;

vec3 parallaxCorrectNormal( vec3 v, vec3 cubeSize, vec3 cubePos ) {

  vec3 nDir = normalize(v);
  vec3 rbmax = (   .5 * ( cubeSize - cubePos ) - pos ) / nDir;
  vec3 rbmin = ( - .5 * ( cubeSize - cubePos ) - pos ) / nDir;

  vec3 rbminmax;
  rbminmax.x = ( nDir.x > 0. )?rbmax.x:rbmin.x;
  rbminmax.y = ( nDir.y > 0. )?rbmax.y:rbmin.y;
  rbminmax.z = ( nDir.z > 0. )?rbmax.z:rbmin.z;

  float correction = min(min(rbminmax.x, rbminmax.y), rbminmax.z);
  vec3 boxIntersection = pos + nDir * correction;

  return boxIntersection - cubePos;
}

void main()  {

  vec3 rVec = parallaxCorrectNormal( vReflect, cubeMapSize, cubeMapPos );
  gl_FragColor = textureCube( envMap, rVec );

})
We want to correct the normal that we use to lookup the cubemap. A cubemap assumes that the images rendered in the different faces are far far away. What we do with the parallaxCorrectNormal function is take that vector, and look where it intersects a volume that defines the scene. I'm using a cuboid because it accurately models the hall model. The interesection test is done by normalising the vector, checking the minimum distance that intersects with a plane of the cuboid on each axis. With that distance, the direction of the normal, the position of the evaluated fragment and the position of the center of cuboid, we can create a new vector to use with textureCube.
Everything checked out, ready to take it further!
The plan
In September last year -about five months ago- I was talking to Emil Karlsson -a fellow Motion Designer from B-Reel's' NYC office- about all these cool projects and videos with architecture visualisation. We decided to try and build something similar: sounded straightforward enough :)
We would try different scenes and materials. It was clear that lighting wouldn't be dynamic: we would have diffuse, normal and specular maps, and the diffuse map would have color, lighting and occlusion baked in. This was before considering using Physically Based Rendering materials (more about this later).
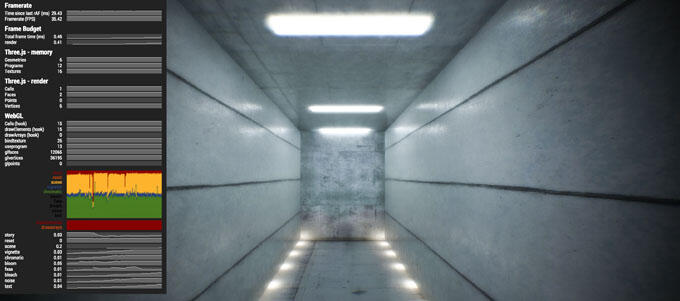
We settled on a corridor-like scene, with vertical windows on each side. I integrated the parallax-corrected shader and started testing. I would get a package from Emil with an .OBJ file and texture maps (diffuse, normal, specular and baked diffuse), replace them in the project and take a look around the scene. I used THREE.OBJMTLLoader for a while, but I ended up creating the material by code and settling with THREE.OBJLoader.
Rendering
The rendering pipeline looked like this:
- Load room model file with THREE.OBJLoader
- Create a THREE.CubeCamera
- Create a THREE.MeshBasicMaterial only with the diffuse map
- Create a THREE.ShaderMaterial with the baked diffuse, normal and specular maps, and the cubemap
- Start the scene
- Render once a cubemap on the center of the scene
- Start the loop, rendering the scene with the ShaderMaterial that performs regular shading plus parallax-corrected reflections
The ShaderMaterial renders a material per-fragment in the following way: baked diffuse (we have no dynamic light in the scene, all lighting is in the texture), calculate the modified normal based on the normal map (it's in tangent space) and use it with the parallax-correct function to get the right normal to look up the cubemap. That gives us very sharp reflections, only disturbed by the normal map.
There are two ways of easily simulating the different reflectance and create more specular or more matte surfaces:
- Changing the resolution of the cubemap: the bigger the texture, the sharper the reflections. Remember that the resolution specified in the CubeCamera constructor is used in the 6 textures that will be generated. Keep that in mind to prevent excessive memory usage.
- Biasing the texture lookup: the texture lookup functions (texture2D, textureCube, etc.) accept a third parameter specifying the bias to the mipmap that will be selected for the lookup. Higher values, blurrier map simulating higher roughness of the surface.
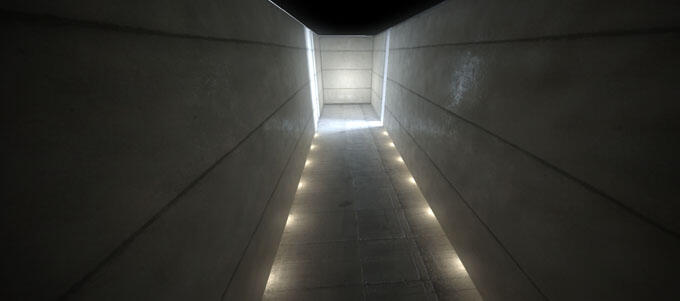
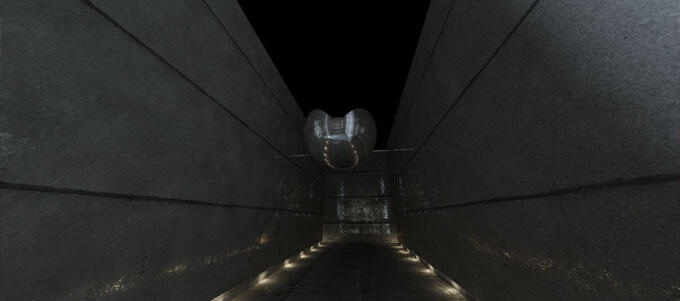
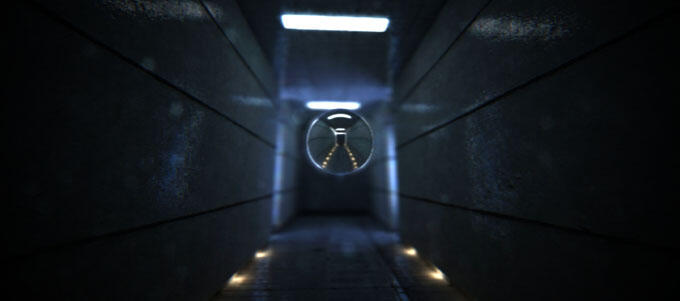
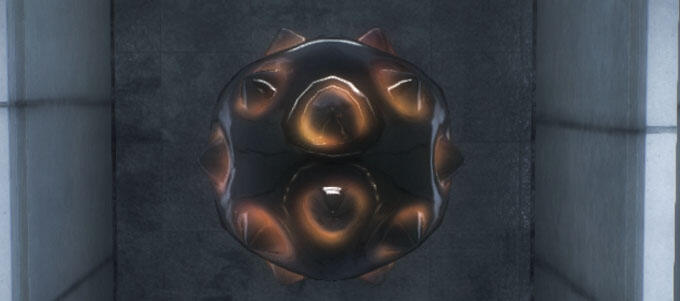
The orb
Initally there was a sphere in the scene, but it wasn't intended as part of the piece; it was there to debug reflections and there wouldn't be any object in the final scene. I thought it was a pity to have such cool reflections and not have an object to use them on. We tried multiple objects and materials.
After adding the orb, the generation of the cubemap had to be tweaked a bit: hide the orb (and all the objects that won't be the environment, for that fact), render the cubemap, and display the orb again. That way it won't be messing with the reflections.
The orb had originally the same material as the room, with a few uniforms to change the outcome, but it turned to be easier to split the shader in two, since the orb ended up not having diffuse or specular map.
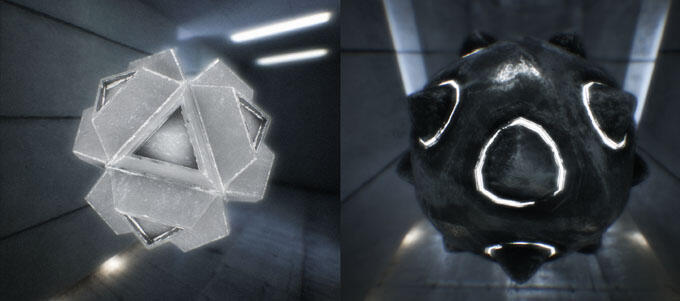
This also introduced a modification on the shading. After the tests with PBR, I made the materials a bit more physically-correct: the power of the highlights decreases with the roughness of the surface, and -of course!- added fresnel all around.
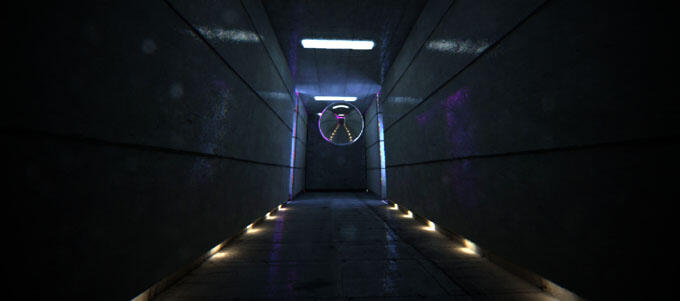
Post-processing
I've been working on Wagner for a while now. Wagner is a composer for three.js, with some design differences from THREE.EffectsComposer.
At the end of last year, working on the Christmas Experiment Beyond -check it out if you haven't yet, it's got sweet snowflake generation and music by Cabbibo. I spent quite some time fixing shaders so they performed on most platforms, and redoing some -like the blur passes- so they run smoothly on ANGLE. It paid out because now it performs nicely even on mobile.
The final passes that made it are:
- Vignette boosts the center of the image, dims the edges. I use it for fades, too
- RGB Split, similar to chromatic aberration: separates RGB channels radially
- DOF (Depth of field) blurs the scene based on the depth buffer.
- Bloom blurs the scene and composes it on top to add a glow feeling
- FXAA (Fast approXimate AntiAliasing) solves antailiasing on FBOs by smoothing out edges
- Bleach performs a color grading step
- Noise removes the computer-generated vibe of the image
Some passes that were there for a while but ended up being removed:
- Dirty lens overlays dust and smudges
- Tonemapping adjusted the color to a blueish tint
- Guided blur was the original DOF method, the scene was blurred using the depth map as bias map
- Bokeh DOF. It's still there, if you dare to enable it!
I also considered combining the passes that could be performed on the same stage of the postprocessing chain (vignette + RGB split, DOF, Bloom, FXAA + Bleach + Noise), but this is a task that could be integrated on Wagner, to combine automatically passes that are not inter-dependent.
Camera work
To move the camera in the scene I planned the shots by moving the camera and writing down nice shots: all you need is the camera position, the camera target and the FOV.
I iterated on the camera scripting system I coded for Beyond. It's very primitive but gets the job done. The storyboard system can be written in plain English, by specifying time marks and actions to modify the value. Right now, it supports three actions: cut to, linear to and ease to.
Update: I've published Storyline.js. Check out the repo for code and examples!
This is an example of a storyline that defines the timeline for a value x -in this case, it's the x coordinate of the camera position.
Storyline script
JavaScript
var storyline = parseStoryline( {
  x: [
    '0 cut to -5',
    '22 cut to 5',
    '51.4 linear to -2',
    '51.4 cut to 11',
    '64.5 linear to 1',
    '64.5 cut to -9.3',
    '80 cut to -1',
    '96 linear to -5.3',
    '96 cut to -1.5',
    '120 linear to 12'
  ]
} );
You can define any value and use it as you please on your project: opacity of the intro text, focal distance of the DOF pass, etc.
It's a bit cumbersome to use, and it would be much better with a nice UI, but it did the job. Creating an integrated timeline editor would have taken the project a bit off the tracks.
Lessons learned
It's taken several months, started september 2014. The activity was sporadical during that time, not constant at all. I'd say in total the development time was four weekends, and a couple of weeks working by night.
Black glass with emissive spots looks awesome, we'll definitely use it in the future.
Split the shader. Considering that there's two objects -the room and the orb-, the cost two drawcalls is perfectly justified and allows the shader to be split in two. That way there isn't a lot of uniforms that define different render paths.
Camera work looks better with straight trajectories. It's easy to go overboard with fancy paths, lots of rotations and impossible sweeps. Slow travellings that let the viewer to grasp the scene work better. Other things to look out for: neck-breaking camera twists and paths that don't move at constant speed. I built THREE.ConstantSpline.js to help with that.
Preload as much as you can. You can use THREE.LoadingManager, and it's got nice support to load models and textures. That way you can keep track of the loading progress and know when everything is ready. See next point about why that's important.
Render a frame before actually starting to force the buffers to be uploaded to the GPU. Don't display the canvas yet, get all the objects that you want to display, enable the materials that you will be using, and do a render call. It will prevent some annying stutter when starting, which is even more noticeable if you're playing audio.
Test on multiple platforms. This is a matter of opinion, but the web is amazing platform to get to a lot of people, better make sure it runs as it should on their machine. Test Chrome/Firefox/Safari/Internet Explorer as you progress to make sure performance and results are correct. For instance, don't wait until you're done to test on Windows: you might discover that some materials are not rendering and debugging that can be a nightmare. Better catch those glitches sooner, right when you're introducing the code that causes them.
Use rStats or similar to profile and keep performance under control. DevTools Timeline and audit performance on Chrome and Firefox are also very useful to control where your page is spending time. If it's spending time in the CPU, you know you have to optimise your JavaScript. If the page spends most time waiting for the GPU, you have to reconsidering the complexitiy of the scene, the structure of drawcalls and the complexity of the shaders. The ideal is to keep both CPU and GPU busy doing as much as possible inside the frame budget.
Keep track of the project, both on a version system, and in media (twitter, instagram, vine, screencaps, etc.). I lost some days work by overwriting the camera script and didn't have it versioned. Keep snapshots to go back and see the progression, and how everything has improved -or worsened, that can happen too!-.

Modern GPUs, even mobile ones, have a huge amount of power. Some though, are overpowered on the fragment shader part, and not so much on the vertex shader part. Low polygonalisation models with heavily shaded materials and post-processing can work really well.
Plans
Hopefully this will be part one of a series of three:
- Part one has consisted in exploring the basics, and to stress-test is we are able to finish a project like this one.
- Part two would have multiple cubemaps and more complex setting, may be even different cubemaps for dynamic lighting
- Part three would replace most of the renderer pipeline for a deferred renderer, and may be give it a try to SSR. I'm not entirely sold on this technique, but it can be worth investigating.
Other nice things to have: more models, DDS textures, original music, more sophisticated camera work and depth of field, better detail textures, a bit more atmosphere overall.
If you are intersted in this project and want to help, drop us a line!